The DijonStock Digital Home Recording Support Forum

*** USER REGISTRATION DISABLED! FOR ACCESS TO THE BOARD, MAIL TO registration AT dijonstock DOT com. THANK YOU ***
It is currently Tue Apr 16, 2024 5:56 am

All times are UTC + 1 hour [ DST ]


Post new topic Reply to topic  [ 31 posts ]  Go to page 1, 2  Next
Author Message
PostPosted: Mon Jan 19, 2015 9:08 pm 
Offline
Lone Star

Joined: Tue Jan 13, 2015 11:37 pm
Posts: 8
Machine type: AW2400
Hello,

This week I finally tried to upgrade my AW2400 by replacing the internal 40GB IDE harddisk. As IT-specialist I do realise that the old harddisk with moving parts don't have an endless lifetime. And the longer I wait, the harder it will get to find working replacement parts.

As I could only find a few old topics about replacing the harddisk with an SSD disk, I just would like to tell that I succeeded in upgrading the harddisk by using the following (recently bought) parts:

- CONRAD SATA to IDE harddisk converter (https://www.conrad.nl/nl/sata-naar-ide-harde-schijf-converter-974497.html)
You will need this as new IDE harddisks are hard to find, especially IDE SSD harddisks. At this time you will mostly find SATA harddisk (non-SSD and SSD).

- Samsung 850 PRO 128GB SSD (http://www.samsung.com/us/computer/memory-storage/MZ-7KE128BW)
Why the Samsung 850 PRO? Well, as I want to extend the life of the AW2400 as much as possible, this disk comes with 10 years warranty. Believe it or not, SSD DO NOT HAVE an endless lifetime. The memory cells on an SSD can also get broken, but you're only sure of the fact that there are no sensitive moving parts in the disk. With this 850 PRO series, I believe that it can be trusted for a long time of worry-free harddisk recording.

After replacing the disk, 118GB of free space is available which seems more than enough for me and 3 times more space than the original 40GB harddisk. When connecting the AW2400 in USB mode to your PC, two disks of 59GB will be available on your PC. Putting back all the song files I had on the original disk resulted in a working AW2400, being able to load all my recorded songs.

In the next posts I will describe the replacement procedure step by step.


Last edited by Robbiedoes on Mon Jan 19, 2015 11:26 pm, edited 1 time in total.

Top
 Profile  
 
PostPosted: Mon Jan 19, 2015 9:42 pm 
Offline
Marker Magician
User avatar

Joined: Tue Aug 01, 2006 4:20 pm
Posts: 4032
Machine type: AW2400
I will follow this thread with great interest. Thanks.

_________________
Byron


Top
 Profile  
 
PostPosted: Mon Jan 19, 2015 10:36 pm 
Offline
Lone Star

Joined: Tue Jan 13, 2015 11:37 pm
Posts: 8
Machine type: AW2400
STEP 1 - Preparations

Prepare the harddisk replacement by:

- Getting the right tools (screwdriver to remove the disk, pillow to protect the AW2400 when turning upside down, some screws to mount the SSD)

Image

- Buying a SATA to IDE converter

Image

- Buying a Samsung 850 PRO 128GB SSD disk

Image

- Creating/burning a CD with the AW-2400 OS 1.13 update (http://download.yamaha.com/search/detail/?site=usa.yamaha.com&language=en&category_id1=16244&product_id=1021076&asset_id=52030)
Just unzip the download at Yamaha and burn the AW2400PG.BIN file to the root of the CD-R.


STEP 2 - Backup all your data

Image

Normally you should backup your data by using the backup function in the AW-2400. This forces you to use CD-R's to burn the backup data. I just put the AW-2400 into USB mode (press USB and confirm the mode change to USB mode), then connect the AW-2400 to my PC and copy all of the data to the harddisk of my PC.

Be aware that when connecting the AW-2400 to your PC in USB mode, two disks will appear on your PC (AW2400-1 and AW2400-2). One disk has the folder "Song1". The other disk has the folders "Song2" and "Transport". Just Copy all the content of both disks to your PC. When restoring the data at the end, you have to put back all the folders to the same locations!


STEP 3 - Removing the old disk

- Shutdown the AW-2400 and remove all the connectors (including power).

Image

- Put the AW-2400 upside down on a table. Use one or two pillows to protect the front knobs and faders of the AW-2400. Now remove the six marked screws on the back.

Image

- Take out the frame including the IDE harddisk and remove the IDE connector and the power connector.

Image

- Remove the old IDE harddisk from the frame by removing the marked screws.


STEP 4 - Built in the new SSD disk

Image

Image

- Now mount the new SSD disk on the frame. Just be creative! Probably you cannot use the old screws and need to find some other (computer)screws to fit in the holes of the SSD disk. You also need to stabalize the construction due to the (unstable) isolationrubbers (used to prevent noise from the old harddisk motor). As the SSD disk has no moving parts, you don't need the isolationrubbers. Feel free to remove them to get a construction that's more stable.

- Put the SATA to IDE converter on the SATA connector of the Samsung 850 PRO SSD disk.

Image

- Put the IDE cable connector on the IDE connector of the SATA to IDE converter. Keep in mind that pin 1 is marked on the SATA to IDE converter and on the IDE cable itself (green colored). It's quite easy to connect it the wrong way with risk of damaging the AW-2400 or the SSD disk.

Image

- Now put back the frame into the AW-2400. As the extra power connector that comes with the SATA to IDE converter could cause unwanted connections to parts of the AW-2400 mainboard, I isolated the extra power connector with strong tape. You don't need the connector and by isolating it, you will be sure to minimize all kind of risks. Put back the 6 screws and the AW-2400 is ready to power on.


More to continue in the next posts....


Last edited by Robbiedoes on Mon Jan 19, 2015 11:29 pm, edited 2 times in total.

Top
 Profile  
 
PostPosted: Mon Jan 19, 2015 10:47 pm 
Offline
Robbie The Botkiller
User avatar

Joined: Sat Jun 19, 2004 12:46 pm
Posts: 5610
Location: Netherlands
Favourite food: Ria's cheesecake
Machine type: AW16G
Newbie of the century! 8)

SSD discs do not have eternal life, au contraire. I had one in my PC and it lasted about one year. And then it was fried.

Welkom op het forum, Robbie de naamgenoot!

_________________

Don't judge the coffee by its cup.
The proof of the cheese is in the eating


Top
 Profile  
 
PostPosted: Mon Jan 19, 2015 11:14 pm 
Offline
Lone Star

Joined: Tue Jan 13, 2015 11:37 pm
Posts: 8
Machine type: AW2400
STEP 5 - OS update & disk format

Image

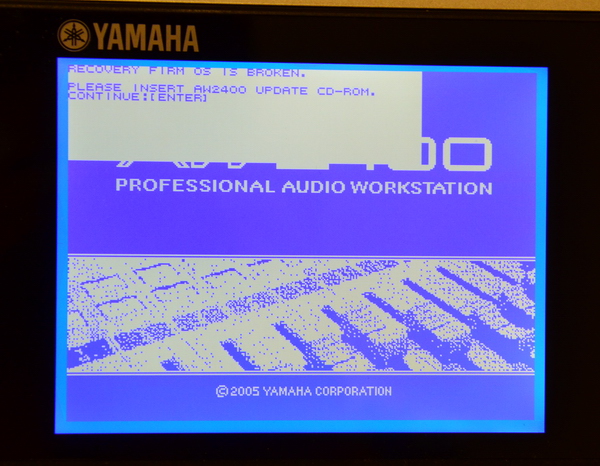
- Now connect the powercable and turn on your AW-2400. In the display you'll see a message that the OS is broken. This is why you need to have the OS 1.13 update on CD. Because the OS is saved to the harddisk and we've replaced the harddisk, we've also removed the OS.

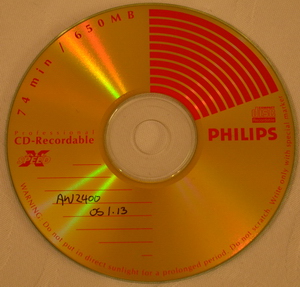
- Put the generated CD-R (as described in step 1) with the Yamaha AW-2400 OS 1.13 update into the CD drive and press the [ENTER] key.

Image

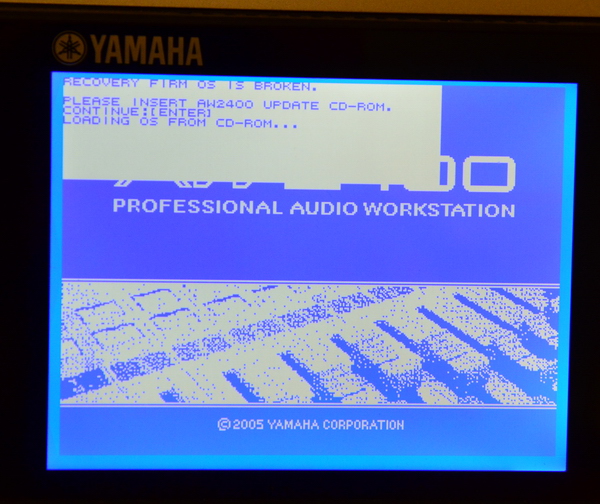
- The OS will be loaded from the CD-R.

Image

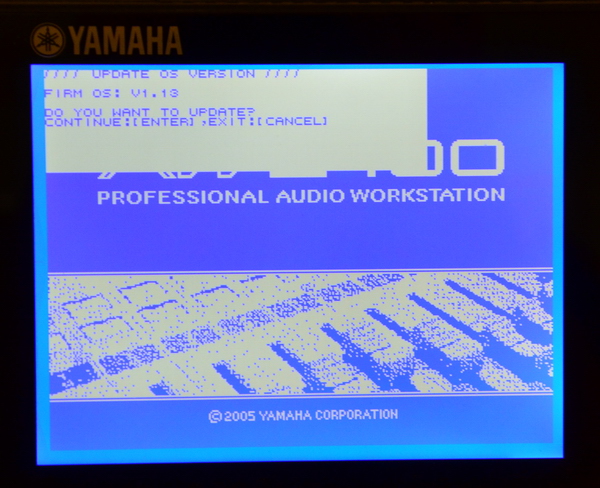
- You will be asked if you want to update the OS. Confirm by pressing the [ENTER] key.

Image

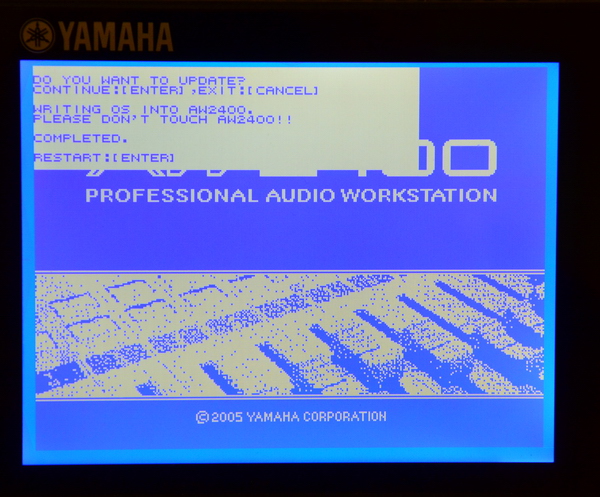
- When finished, press the [ENTER] key to restart the AW-2400.

Image

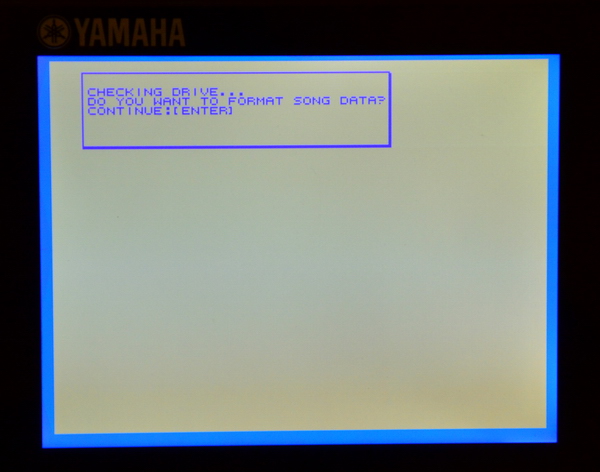
- Now it needs to format the new disk for supporting the song data format. Confirm by pressing the [ENTER] key.

Image

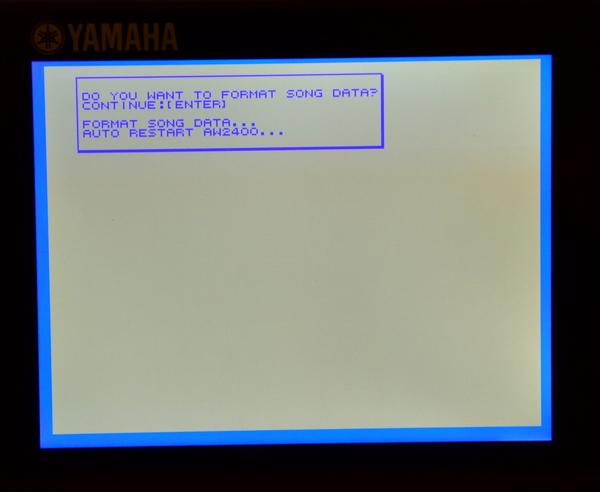
- When finished, the AW-2400 will automatically restart.


STEP 6 - Fader calibration

Image

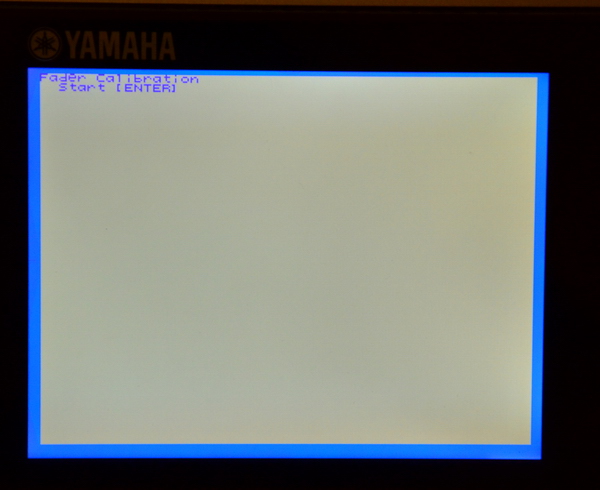
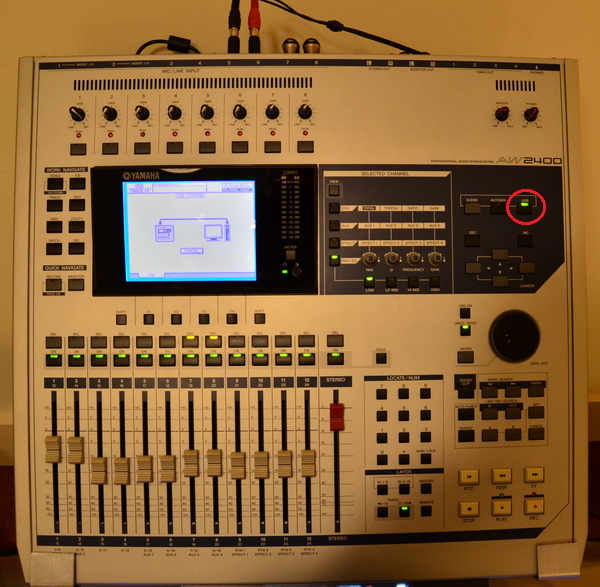
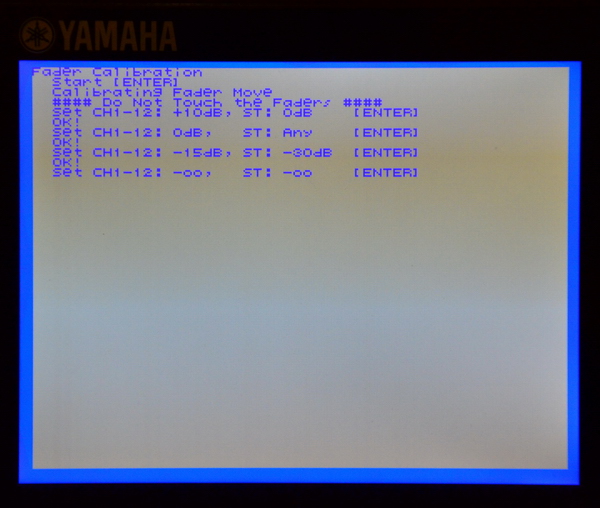
- When the restart of the AW-2400 is completed, a fader calibration process has to be completed. Make sure that nothing prevents the faders for moving up and down. Press the [ENTER] key to start the calibration.

- At this point DON'T TOUCH THE FADERS!!! Let them move automatically and wait for the next screen information.

Image

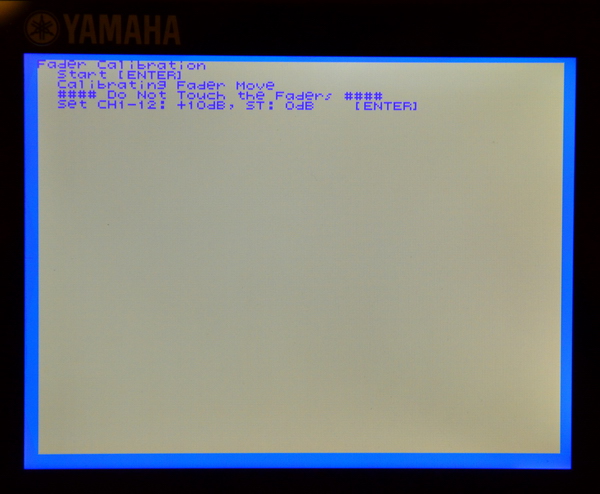
- When the first step is complete, you will be asked to put all the faders in the top position (that is +10dB for the white faders and 0dB for the red fader).

Image

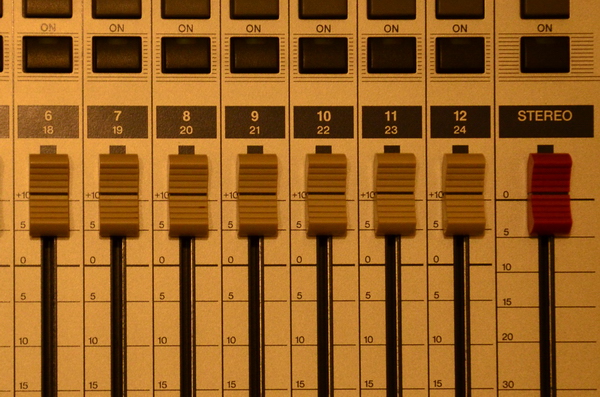
- Now put all the faders to top position and press the [ENTER] key when done.

Image

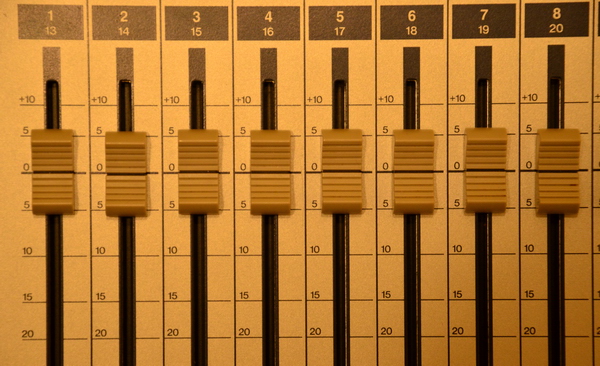
- Now you will be asked to put the white faders in the 0dB position (the red fader can be ignored this step). Press the [ENTER] key when done.

Image

- Now you will be asked to put the white faders in the -15dB position and the red fader in the -30dB position. Press the [ENTER] key when done.

Image

- And as last step you will be asked to put all faders completely down.

Image

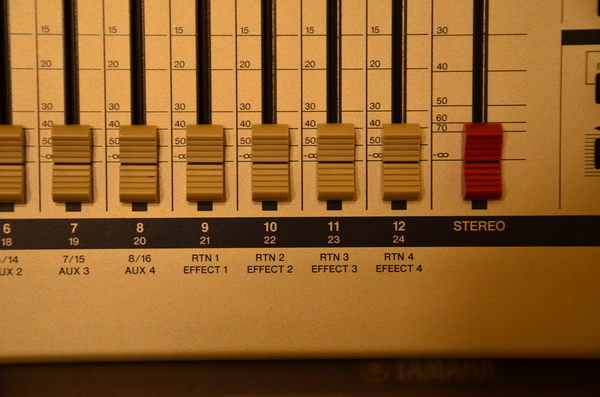
- Now put all the faders completely down and press the [ENTER] key when done.

Image

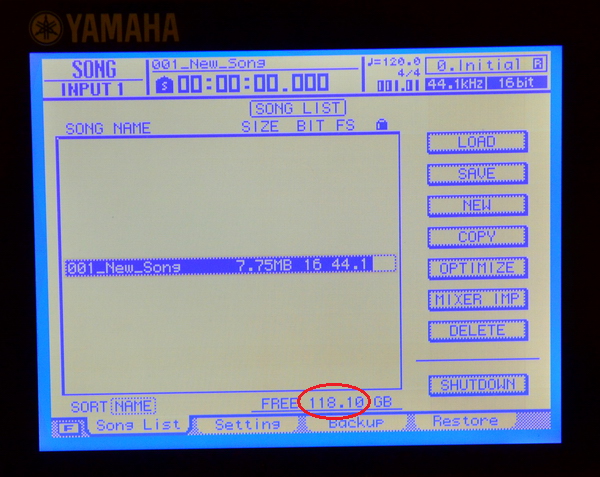
- Congratulations! All steps are succesfully passed and the AW-2400 will start in the SONG menu, showing a new (empty) song. Notice the new free disk size of 118.10GB.


STEP 7 - Restoring data

Before you continue restoring your previous data, be aware you need to restart the AW-2400 manually once!!

Restoring your data is easy.

- Put your AW-2400 into USB mode.
- Connect your PC to the AW-2400.
- Remove the newly created "new song" from the new disk (empty the content of the Song1 and Song2 map).
- Copy back the contents of the Song1 , Song2 and Transport maps as made in step 2.
- Exit USB mode

You will be prompted that the last loaded song could not be found anymore, which is no problem. Confirm the "Oh I see...." message and another (restored) song will be loaded.


Last edited by Robbiedoes on Tue Jan 20, 2015 9:08 am, edited 2 times in total.

Top
 Profile  
 
PostPosted: Mon Jan 19, 2015 11:19 pm 
Offline
Lone Star

Joined: Tue Jan 13, 2015 11:37 pm
Posts: 8
Machine type: AW2400
LAST HINT ABOUT FADER CALIBRATION

If something goes wrong during the fader calibration, you can restart the fader calibration at any time by powering on your AW-2400 while pressing (and holding!!) the [JOG ON] and [ENTER] keys together until the fader calibration screen will appear.


Top
 Profile  
 
PostPosted: Wed Jan 21, 2015 4:59 pm 
Offline
Greenhorn

Joined: Tue May 28, 2013 5:44 pm
Posts: 112
Favourite food: Pizza
Machine type: AW2400
Great stuff! Many thanks for the time, effort, and expertise.


Top
 Profile  
 
PostPosted: Thu Jan 22, 2015 2:29 am 
Offline
Tinhorn
User avatar

Joined: Sun Jan 22, 2012 12:21 am
Posts: 213
Location: central maine, usa
Favourite food: home made tortillas
Machine type: AW4416
would this upgrade be possible in an aw4416 ? :-k

mark


Top
 Profile  
 
PostPosted: Thu Jan 22, 2015 5:09 pm 
Offline
Spaminator Extraordinaire
User avatar

Joined: Tue Jun 22, 2004 10:58 pm
Posts: 8732
Favourite food: sushi
Machine type: AW2400
Excellent thread. Nicely explained and the photos makes it possible for a novice like myself to try.

Thanks for sharing.

_________________
GSMUSIC: Hey RZ, Im not no upper class american, the gear I own is what I have special to me. My car sucks, my house sucks, my nieghborhood sucks. Does yours RZ? Does it?

rz-land


Top
 Profile  
 
PostPosted: Fri Jan 23, 2015 12:58 am 
Offline
Robbie The Botkiller
User avatar

Joined: Sat Jun 19, 2004 12:46 pm
Posts: 5610
Location: Netherlands
Favourite food: Ria's cheesecake
Machine type: AW16G
How should one call a newbie that is obviously not a newbie?

_________________

Don't judge the coffee by its cup.
The proof of the cheese is in the eating


Top
 Profile  
 
PostPosted: Fri Jan 23, 2015 4:39 pm 
Offline
Greenhorn

Joined: Tue May 28, 2013 5:44 pm
Posts: 112
Favourite food: Pizza
Machine type: AW2400
Perhaps Obi-Wan KeNewbie.


Top
 Profile  
 
PostPosted: Thu Feb 26, 2015 1:46 pm 
Offline
Lone Star

Joined: Tue Jan 13, 2015 11:37 pm
Posts: 8
Machine type: AW2400
hudrodguy wrote:
would this upgrade be possible in an aw4416 ? :-k

mark


Hi Mark,

Unfortunately I don't have any experience with the AW4416, but I expect that it will work on the AW4416 too. Just like the AW2400 it's also using an (old) IDE harddisk interface.


Greetings,

Robert


Top
 Profile  
 
PostPosted: Sun Mar 01, 2015 9:00 pm 
Offline
Mr. Blues
User avatar

Joined: Tue Jan 08, 2008 6:51 pm
Posts: 3374
Location: Germany
Favourite food: Sauerkraut ;-)
Machine type: AW2400
Robert

A great tutorial for changing the HD. I have 2 HDDs in spare. Is the AW2400 faster in loading and use with the SSD?

Thank you very much
Andreas

_________________
Blues aint nothing but the blues!


Top
 Profile  
 
PostPosted: Mon Mar 02, 2015 4:37 pm 
Offline
Tinhorn
User avatar

Joined: Sun Jan 22, 2012 12:21 am
Posts: 213
Location: central maine, usa
Favourite food: home made tortillas
Machine type: AW4416
Robbiedoes wrote:
hudrodguy wrote:
would this upgrade be possible in an aw4416 ? :-k

mark


Hi Mark,

Unfortunately I don't have any experience with the AW4416, but I expect that it will work on the AW4416 too. Just like the AW2400 it's also using an (old) IDE harddisk interface.


Greetings,

Robert


hi robert,

your thread is very interesting and complete ... i have started acquiring the parts needed and i will keep the thread informed of my progress ... this is exciting !
there are 2 aw4416s in my arsenault so the backup unit will be used as a test bed ...

mark


Top
 Profile  
 
PostPosted: Mon Mar 02, 2015 5:07 pm 
Offline
Lone Star

Joined: Tue Jan 13, 2015 11:37 pm
Posts: 8
Machine type: AW2400
Blackbeer wrote:
Robert

A great tutorial for changing the HD. I have 2 HDDs in spare. Is the AW2400 faster in loading and use with the SSD?

Thank you very much
Andreas


Hi Andreas,

I don't think the AW2400 performance is faster with the SSD. The machine itself is just working on old technical specifications. Personally I don't see any difference. Probably the performance is just related to the internal processor.

By the way, I think the performance of the AW2400 is very well balanced for a machine at that time. Even with a big multitrack everything works fine here.


Top
 Profile  
 
PostPosted: Mon Mar 02, 2015 9:43 pm 
Offline
Marker Magician
User avatar

Joined: Tue Aug 01, 2006 4:20 pm
Posts: 4032
Machine type: AW2400
Yes, the 2400 is a great machine, with even performance. I rarely have any issues whatsoever, but I did have a strange one the other day.

I had occasion to attempt to build a song track of a ragtime style song that goes around and around six times by piecing a good section of the track ( the first three go rounds ) twice. Didn't come out as I wanted (found another work-around), but in the course of the effort I had occasion to use EDIT > COPY(ALL Over). The 2400 would not do it. But the UNDO list indicated that it had been done. I had data on six tracks (1-3 on V1, 4-6 on V2, respectively). I wanted to copy all six,at once, to V.8. on track 1-6 respectively. When I did them individually, or as stereo pairs it worked, not so with the ALL command. I thought I had done that before, but maybe not???

A rare occurrence with this machine. Perhaps i'll have another go at a bench test.

_________________
Byron


Top
 Profile  
 
PostPosted: Tue May 05, 2015 6:12 pm 
Offline
Lone Star

Joined: Tue May 05, 2015 3:59 pm
Posts: 6
Favourite food: curry
Machine type: AW2400
Problem!

Hi all this is my first post.

My hard drive is playing up and I found this thread. I contacted Scan computers today to buy the SSD and the converter only to be told not to as replacing a HD with an SSD without using Win 7 will cause the SSD to fail in a very short time.

On a scale of 1-10 my computer hardware literacy is about 4 so I was confused by this explanation, but he would not take my order.

What he said was that to use an SSD requires "Trim Control" which is present in win7. My understanding is that trim control controls where the data is stored on the ssd. I might be wrong of course especially as I believe he was "waffling". He even had the cheek to say I should up grade to modern equipment! Ha what does he know.

So can anyone shed light on this and confirm whether the ssd replacement as described here will work properly in the long term as the original drive did.

I have already tried to change the HD to a similar one and even with Yamaha UK's help failed as the 2400 did not recognize the new drive. And I tried everything to get it to work without success so if anyone knows which HD will work (I could not find a fujitsu HD anywhere on the net at the time) then please let me know.

I have used the 2400 for 8 years without a problem, except for being unable to get a new drive to work!


Top
 Profile  
 
PostPosted: Tue May 05, 2015 6:54 pm 
Offline
Greenhorn

Joined: Tue May 28, 2013 5:44 pm
Posts: 112
Favourite food: Pizza
Machine type: AW2400
Perhaps someone with more IT expertise will come along, but the Win 7 thing does not sound correct to me. I've been running an SSD drive on my desktop computer with Win 8.1, and have never experienced any problems at all ... and clearly Robbiedoes has executed this procedure successfully. Stay with it.


Top
 Profile  
 
PostPosted: Thu May 07, 2015 12:00 am 
Offline
Spaminator Extraordinaire
User avatar

Joined: Tue Jun 22, 2004 10:58 pm
Posts: 8732
Favourite food: sushi
Machine type: AW2400
I know zilch about computers so I most likely wouldn't attempt this ssd drive nor the one Keefy attempted with the 160gb drive. I'd be more inclined to try Keefy's version and after reading his explanation of which drive to buy on the other thread, it makes sense. I'm sure either way will work if you have the ability and nerve.

_________________
GSMUSIC: Hey RZ, Im not no upper class american, the gear I own is what I have special to me. My car sucks, my house sucks, my nieghborhood sucks. Does yours RZ? Does it?

rz-land


Top
 Profile  
 
PostPosted: Fri Feb 09, 2018 12:33 am 
Offline
Boot Polisher
User avatar

Joined: Wed Feb 07, 2018 1:29 pm
Posts: 76
Location: England
Favourite food: marzipan
Machine type: AW2400
Thanks a lot for this info! Ive just gone ahead and ordered the same thing, SSD adaptor and 2.5" to 3.5" converter chassis.
Ill reply back on how it goes once parts arrive :)

_________________
My music website with free downloads :) https://www.rikibuckingham.com


Top
 Profile  
 
Display posts from previous:  Sort by  
Post new topic Reply to topic  [ 31 posts ]  Go to page 1, 2  Next

All times are UTC + 1 hour [ DST ]


Who is online

Users browsing this forum: No registered users and 4 guests


You cannot post new topics in this forum
You cannot reply to topics in this forum
You cannot edit your posts in this forum
You cannot delete your posts in this forum
You cannot post attachments in this forum

Search for:
Jump to:  
cron
Powered by phpBB® Forum Software © phpBB Group